Introduction
Conducting of corporate educational webinars, conferences or meetings uses existing SIP-based services and solutions. However, such services usually lack wide Internet broadcasting capabilities. Existing services, such as Zoom.us, InterCall, Twilio, Vidyo, iMeet and so on, as well as various hardware and software solutions and products by other vendors do not offer ways to convert a SIP conference to wide broadcasting via Internet.
Below we review possible ways to integrate two stream video servers, namely Adobe Media Server and Wowza Streaming Engine, Twilio, Zoom.us, Vidyo, Lifesize, Blue Jeans, iMeet services, CounterPath Bria 4 softphone and Flashphoner Web Call Server 4 platform in different combinations.
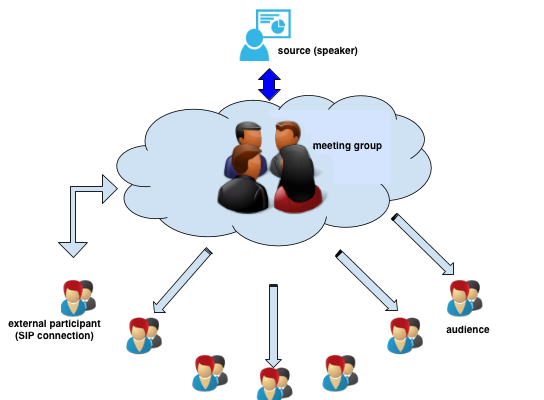
Our original code samples could show simple way which can help you manage out one of the known integration software - Web Call Server. It is important key moment of having useful code with proven functionality in case that you need to embed this code into your application.
Below we review possible ways to integrate two stream video servers, namely Adobe Media Server and Wowza Streaming Engine, Twilio, Zoom.us, Vidyo, Lifesize, Blue Jeans, iMeet services, CounterPath Bria 4 softphone and Flashphoner Web Call Server 4 platform in different combinations.
Using the code
At the end of this article you will be able to download whole html file with useful code, but before that a few key explanations about what really our code can do.
Two functions below could collect all necessary data for the further REST query, which is in particular, URL (of the Web Call Server), data (command parameters for the server):
function sendREST(url, data) {

            console.info("url: " + url);

            console.info("data: " + data);

            $.ajax({

                url: url,

                type: 'POST',

                contentType: 'application/json',

                data: data,

                success: function () {

                    alert('REST request has been sent. Please check Developer Tools > Console output.');

                    console.info("REST successfully done");

                }

            });

        }
Function above will return "REST successfully done" in case of success.
Next key function help you establishing call between Web Call Server and any content source (like online meeting service, softphone etc) with mandatory parameters (usually provided by the content sources)
function startCall() {
var url = document.getElementById("resturl").value + "/call";
var connectionDetailsFormObject = $('#ConnectionDetailsForm').serializeObject();
var RESTCallFormObject = $('#RESTCallForm').serializeObject();
RESTCallFormObject.connection = connectionDetailsFormObject;
var data = JSON.stringify(RESTCallFormObject);
sendREST(url, data);
}
Pay attention that URL should not have ./call part at the end, because this part of URL will be added automatically by the function.
So, for the purpose of the further simple and clear explanations in this article we will show how to use above code in a few examples with different services and cases in 'manual' mode, but you can embed this code into your applications and use it in an automatic mode.
Test conditions
When we decided to test various services and software for mutual compatibility and wide Internet broadcasting capabilities, we picked several services and products based on certain criteria.
Basic requirements to the software-service integration server are:
- flexible configuration to match various integrated services and software;
- thorough documentation;
- technical support from the manufacturer;
- ease of administration.
The main selection criterion when picking services was: а) the service provides a software evaluation period; б) the service declares or implies connection of participants via the SIP protocol. We have made exclusions for the Zoom.us service and Bria. We know the softphone and its capabilities and features very well, while Zoom.us is a new startup service with a lot of declared functions, so we decided to test it anyway (even though SIP connection is paid in this service). Based on the above stated criteria of selection, our experience with various integration software and easy of use of the given software, we decided to use Web Call Server 4 to conduct our study. However, usage of other software is possible too.
Layout of the experiment
One of the most common ways of interaction between the source (on the right) and the recipient of the content (on the left) is displayed on the diagram below:
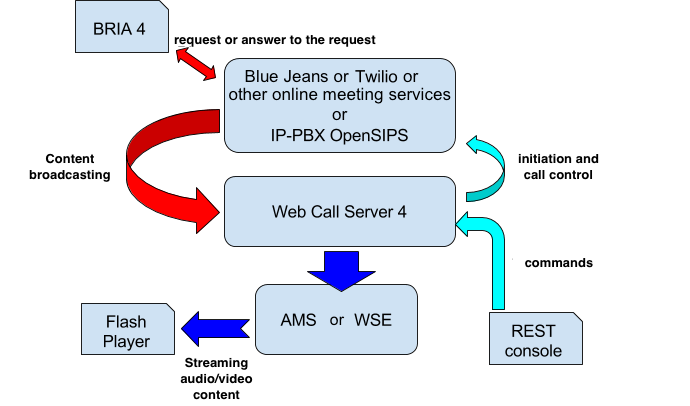
Note, that while testing various ways of interaction using the integration platform we modified the above diagram depending on requirements of the experiment.
Stream video servers used in the experiment:
- Wowza Streaming Engine
- Adobe Media Server
Integration platform:
- Flashphoner Web Call Server 4
- REST console (Google Chrome)
Broadcast sources:
- CounterPath Bria 4
- Twilio.com service
- Zoom.us service
- iMeet service
- Vidyo service
- Blue Jeans service
- Lifesize service
Software to view broadcast (or content):
Software to send RTMP stream to the server:
- Adobe Flash Media Live Encoder 3.2
The requirement to the experiment is correctly installed and configured software products described above. The screenshot below shows configuring Adobe Flash Media Live Encoder installed to a local client (outside of the local network where the CDN platforms run).
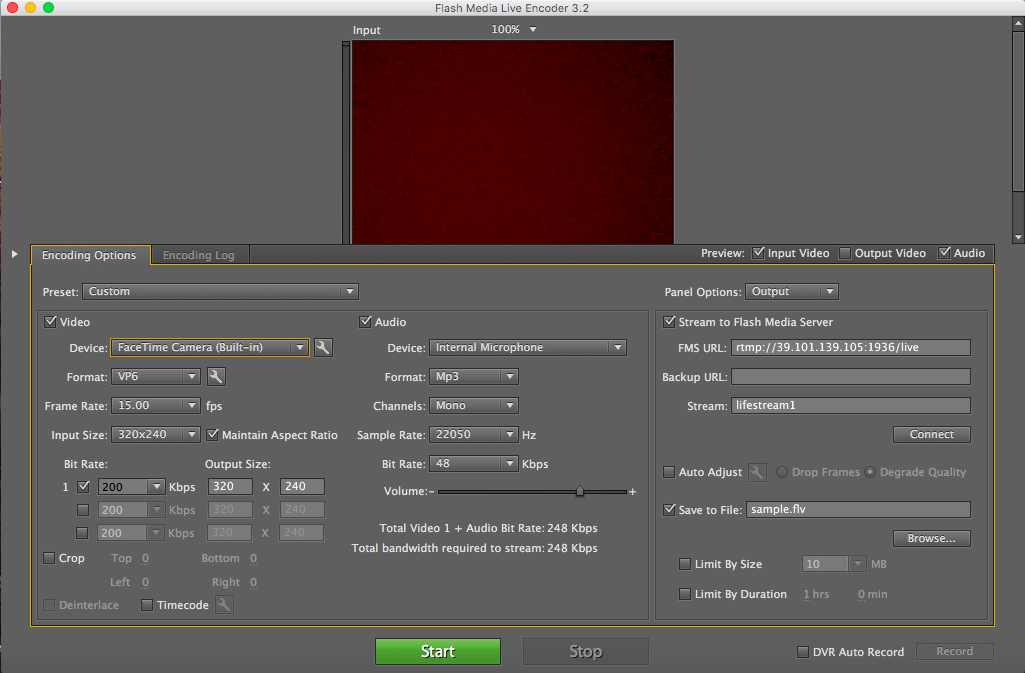
We used Adobe Flash Media Live Encoder broadcast as a reference source of audio/video stream through the streaming video server.
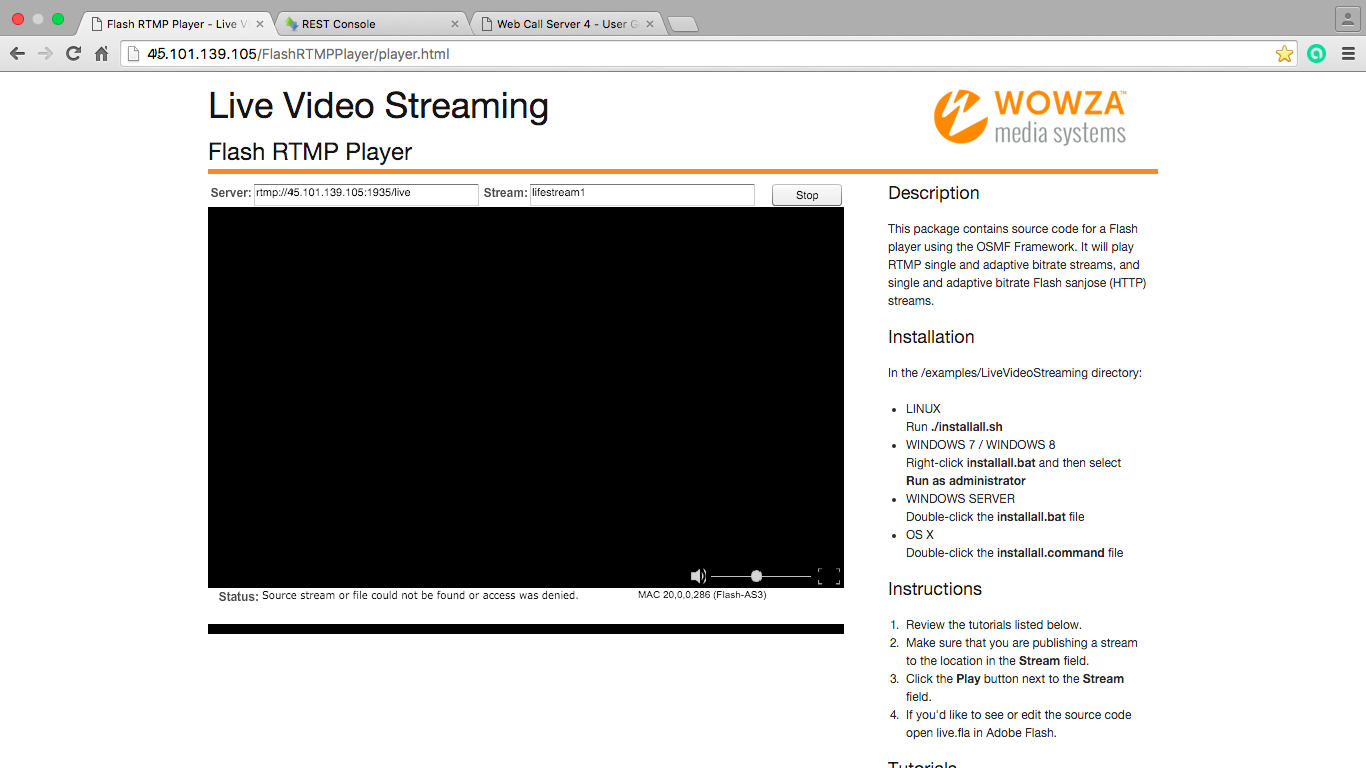
The resulting stream (past the streaming video server) was checked with Flash Player (shown on the screenshot below).
It is crucial to carefully configure stream settings (IP address, port, stream name) both of the source and of the recipient (player).
Broadcast testing diagram (or the streaming server operation diagram) is shown below:

After we check the fact that the audio/video stream reaches the RTMP server (that's basically what we see in the player), we can start the test. Before testing the Web Call Server tandem with the Twilio service, we should find out the public IP address allocated by the service provider for Web Call Server to access the Internet.
This address should be specified in the SIP domain settings. The same operation must be done for the public IP address we use to test Twilio with Bria installed on the local computer.
Integration cases
Integration with zoom.us
The growth of interest to remote education and geo-distributed audio/video information real-time exchange gives birth to various services providing the required functions. One of such services is zoom.us. The testing diagram for this service is as follows:
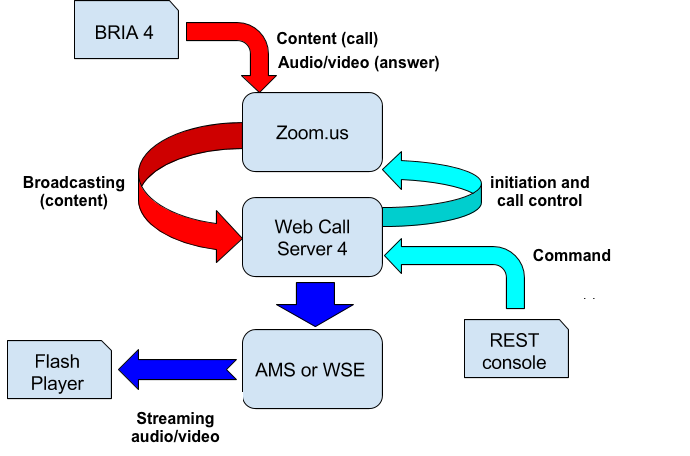
At first, you should configure the account and go through steps of virtual class "initialization" (see the screenshot).

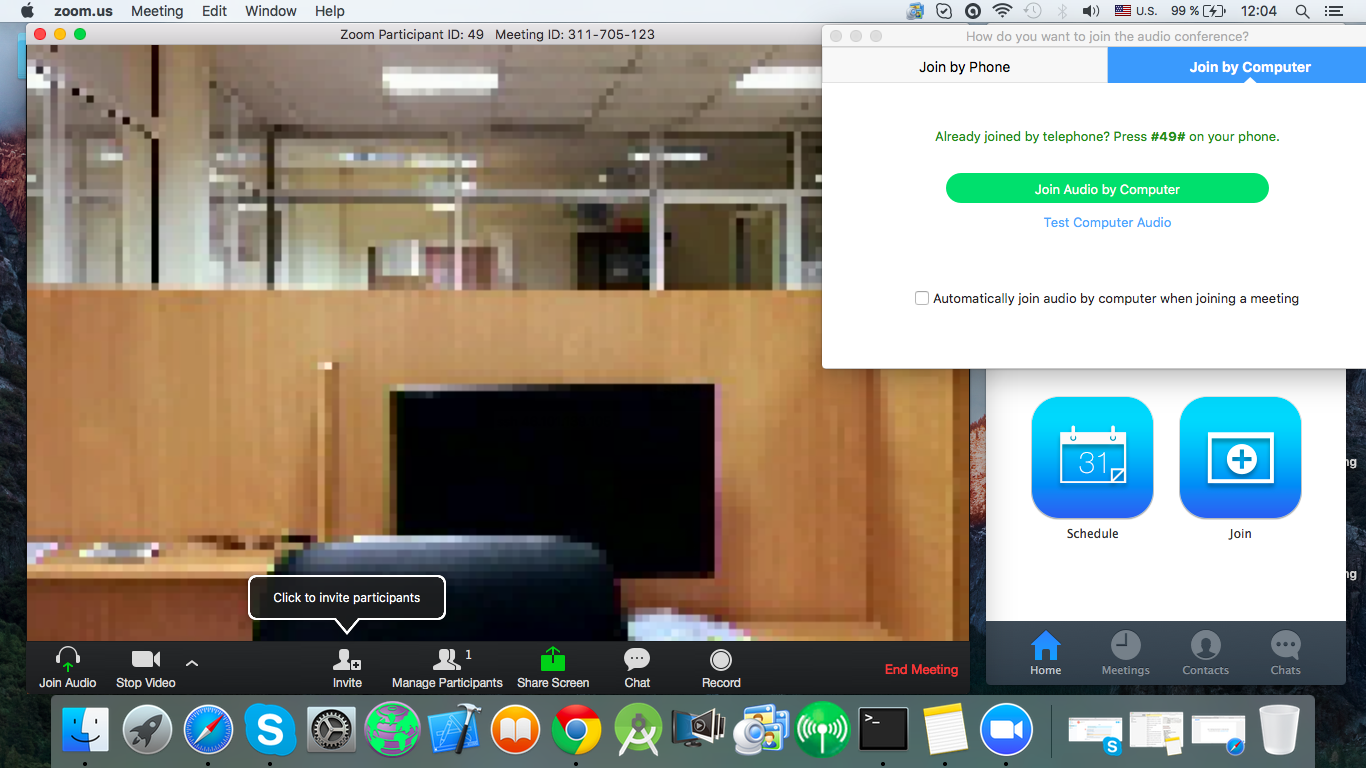
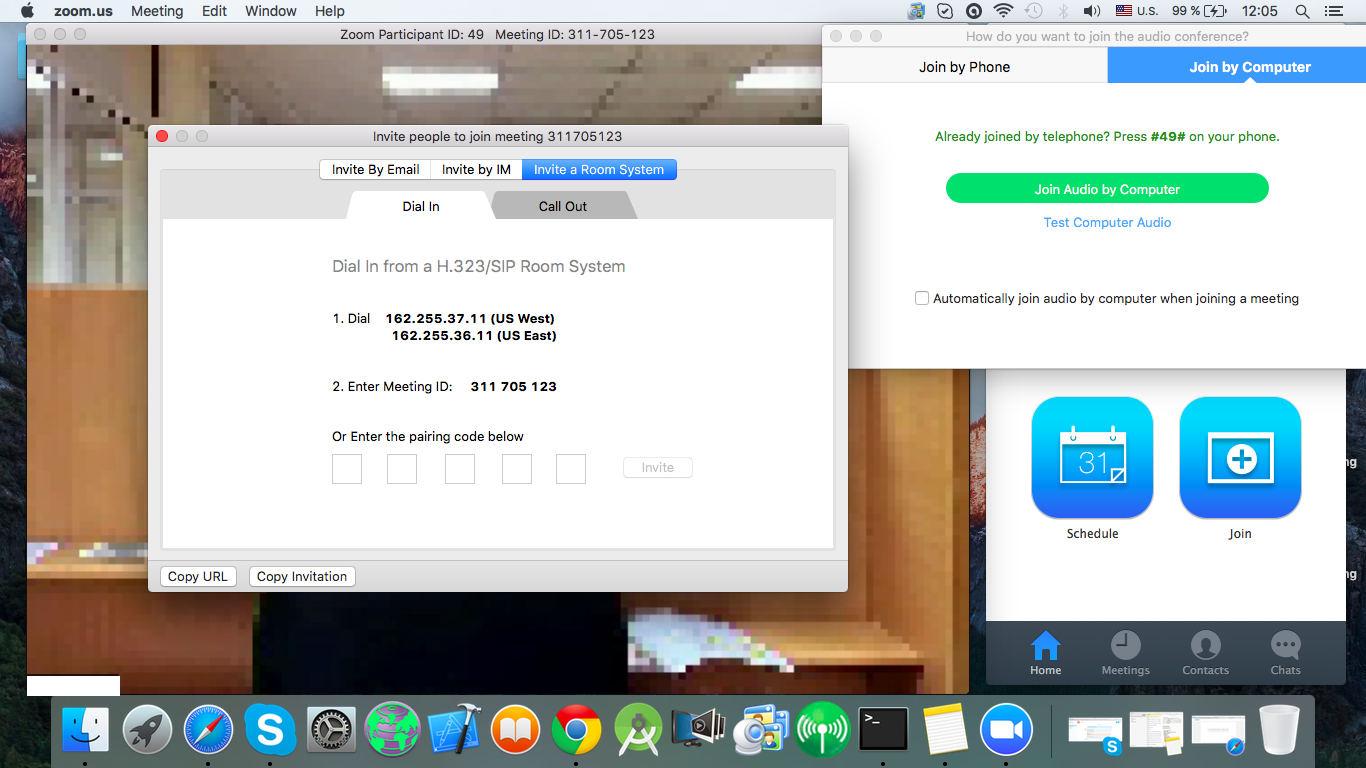
After initialization, the software provided by the service is launched. It captures voice from the microphone and video from the camera. A unique 9-digit ID is assigned to each meeting. By telling this ID along with the IP address of the broadcasting service, you can invite other participants to the meeting. The steps are shown on the screenshots below.
As a result, if we have the IP address and the ID of the meeting provided by zoom.us, we can configure Web Call Server 4 and a viewer to participate in the meeting.
Running and configuring Web Call Server
Inspite of Web Call Server 4 is an integration tool to couple various content sources with streaming servers, each conference (or other source) can have individual settings, specifics and undocumented requirements to implementation of standard SIP and RTMP protocols.
In our reference case both streaming servers are installed on the same device, so first we need to make sure only one of them is working at a time (AMS or WSE). Otherwise, (if each server runs on its own device) the next step is not necessary.
We had to force one of the streaming servers to stop, as shown below:
[root@wowza ams]# ./amsmgr server ams stop

Server: ams command: stop

NPTL 2.12

Stopping Adobe Media Server (please check /var/log/messages)

Server has shutdown…

[root@wowza ams]# service

WowzaStreamingEngine start WowzaStreamingEngine: starting…
In this particular case, AMS is stopped (we know it worked on the port 1936), and Wowza Streaming Engine works on the port 1935 and IP 45.101.139.105.
Then, we need to make sure Web Call Server 4 server configuration matches parameters of the content source we use (in this case - zoom.us). To do this, we can ask the server where Web Call Serverv 4 is deployed via ssh and in the ./conf folder locate a configuration file, as it is shown below:
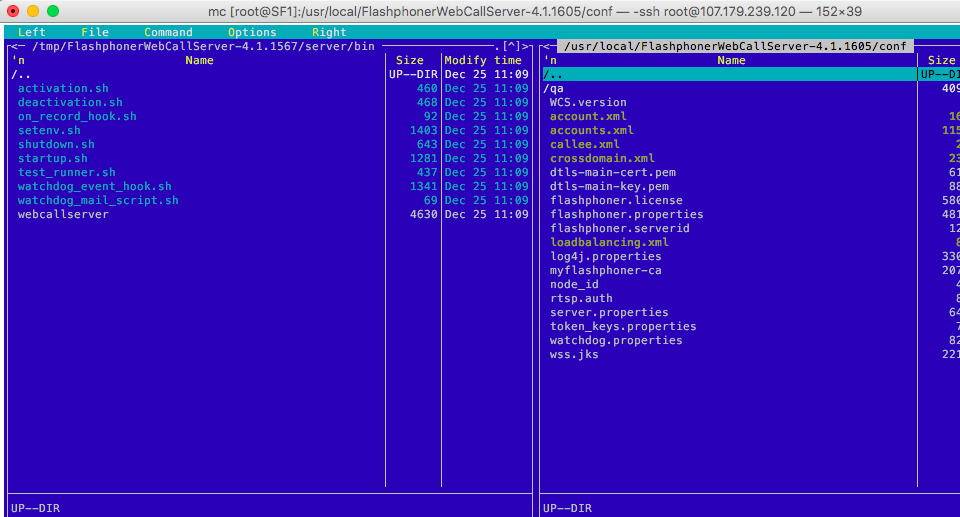
In the file, we need to adjust codecs parameters and some others as shown on the picture. Comment out parameters that should apply to other services:
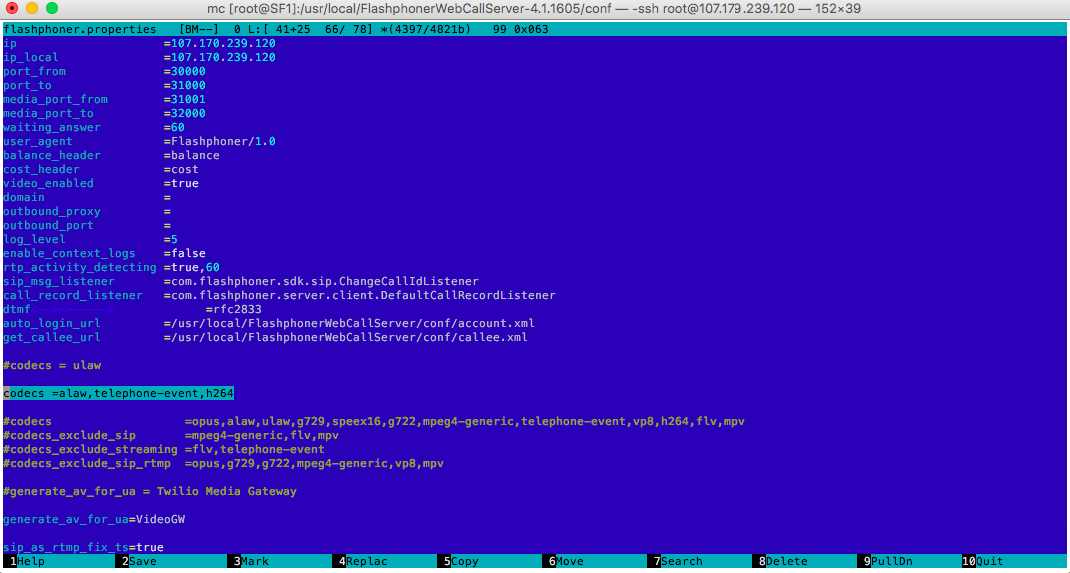
As soon as all new parameters are saved in the configuration file, restart Web Call Server 4 (shown below):
[root@SF1 conf]# service webcallserver stop

FlashphonerWebCallServer: stopping [OK]

[root@SF1 conf]# service webcallserver start

FlashphonerWebCallServer: starting [OK]
As a result, we have correctly functioning streaming video server and Web Call Server 4, so we can start managing Web Call Server 4 and the broadcast source.
Initializing connection via Web Call Server 4
Now, as we have installed, configured and correctly working Web Call Server 4, we should take into account this software is an agent between the source of the content and the streaming server. Generally, the mediation is about initiating a call to the source of content via SIP, receiving the answer from the source of content, receiving the content and broadcasting the content to the streaming server.
Web Call Server itself requires certain controls. This is implemented with REST/JSON API commands. Such a mechanism can be easily embedded to any existing product and provide automatic control over Web Call Server.
In our case, we use the REST console to send parametrized requests to Web Call Server. Requests, in turn, may vary depending on which specific source of content has to be integrated to CDN. For example, to connect to a meeting started form the zoom.us service, the following request should be sent (that's what we do in the REST console of Google Chrome):
{
"callId":"Xq2tlLcX89tTjaji",                          # arbitrary unique call id
"callee":"10000",                                     # callee name (random example)
"rtmpUrl":"rtmp://45.101.139.105:1935/live",          # broadcast address (CDN platform)
"rtmpStream":"lifestream1",                           # stream name
"hasAudio":"true",                                    # audio content attribute (has audio, yes/no)
"hasVideo":"true",                                    # video content attribute (has video, yes/no)
"connection":                                         # connection parameters
             {
              "sipLogin":"10000",                      # login
              "sipPassword":"10000000",                # password
              "sipAuthenticationName":"10000",         # authentication name
              "sipDomain":"162.255.36.11",             # IP address of the meeting (provided by zoom.us)
              "sipPort":"5060",                        # SIP broadcasting port
              "sipRegisterRequired":"false",           # domain registration attribute
              "appKey":"callApp"
              }
}
A request with the given parameters is sent to a special URI Web Call Server, as shown on the picture:
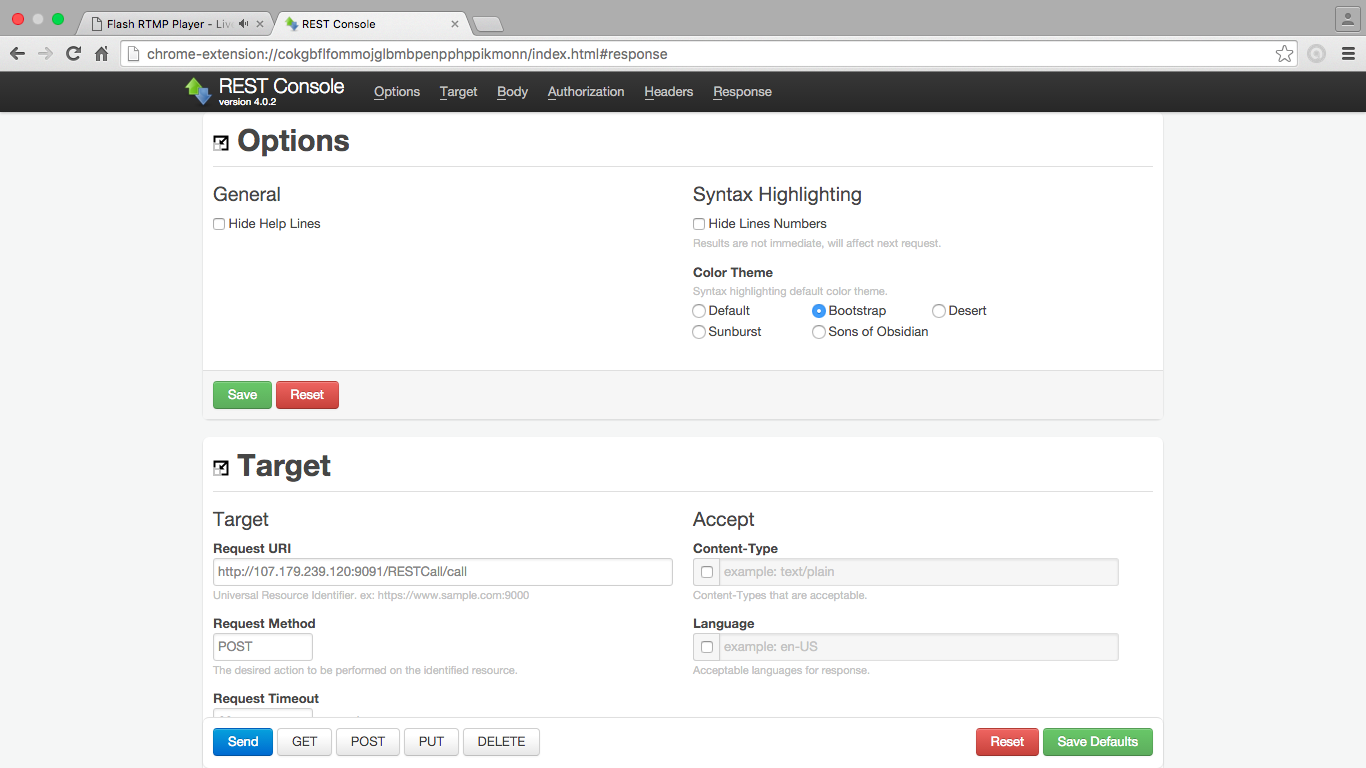
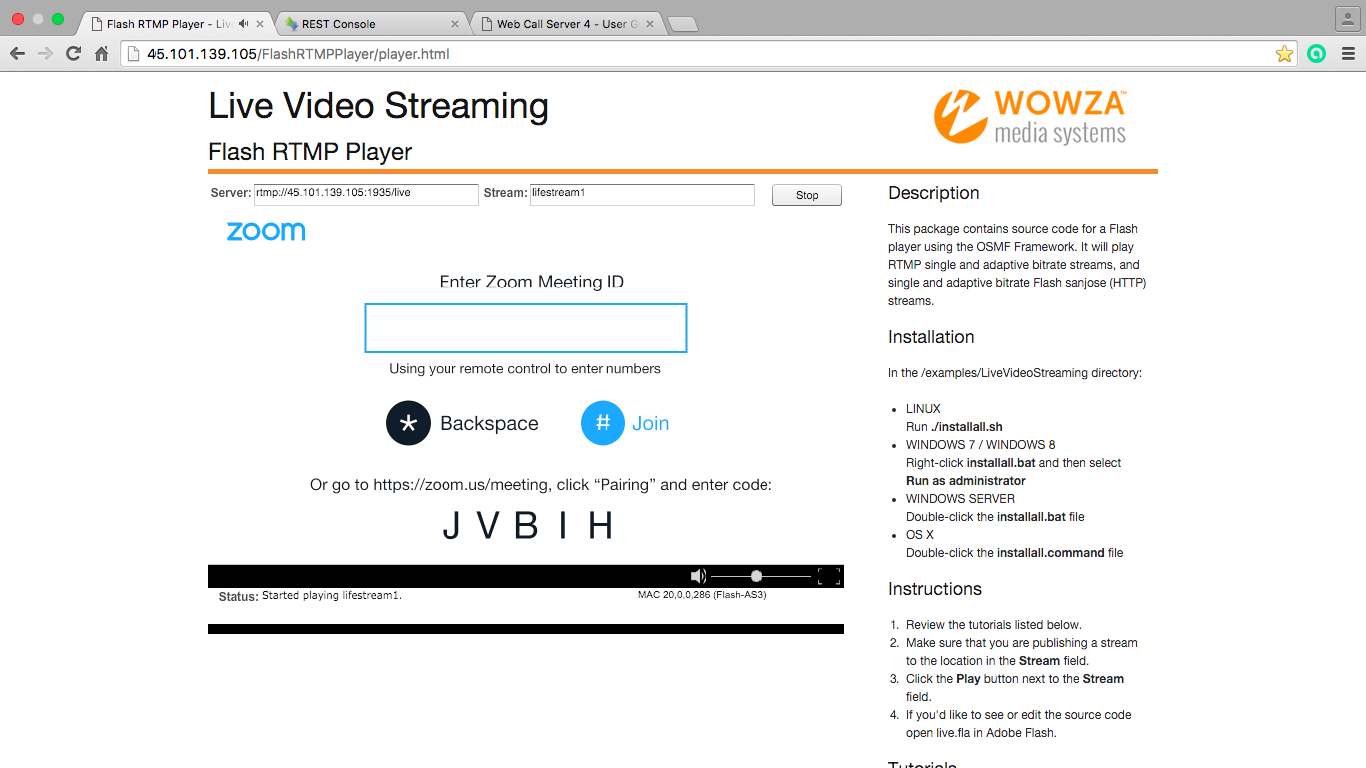
After the request is processed, Web Call Server 4 connects to the meeting started by zoom.us as one of listeners. Simultaneously, the response of the zoom.us content service is received by Web Call Server 4 and is redirected by it to streaing video servers. This is illustrated below:
Managing the connection with Web Call Server 4
In case of zoom.us, you need to additionally connect to the given meeting by sending to zoom.us a specific identifier of the meeting (provided by the service). In our case the id is 311 705 123. Among ways to accomplish this is DTMF dialing (for instance, using softphone keyboard). Web Call Server 4 can also do this as shown on the screenshot:
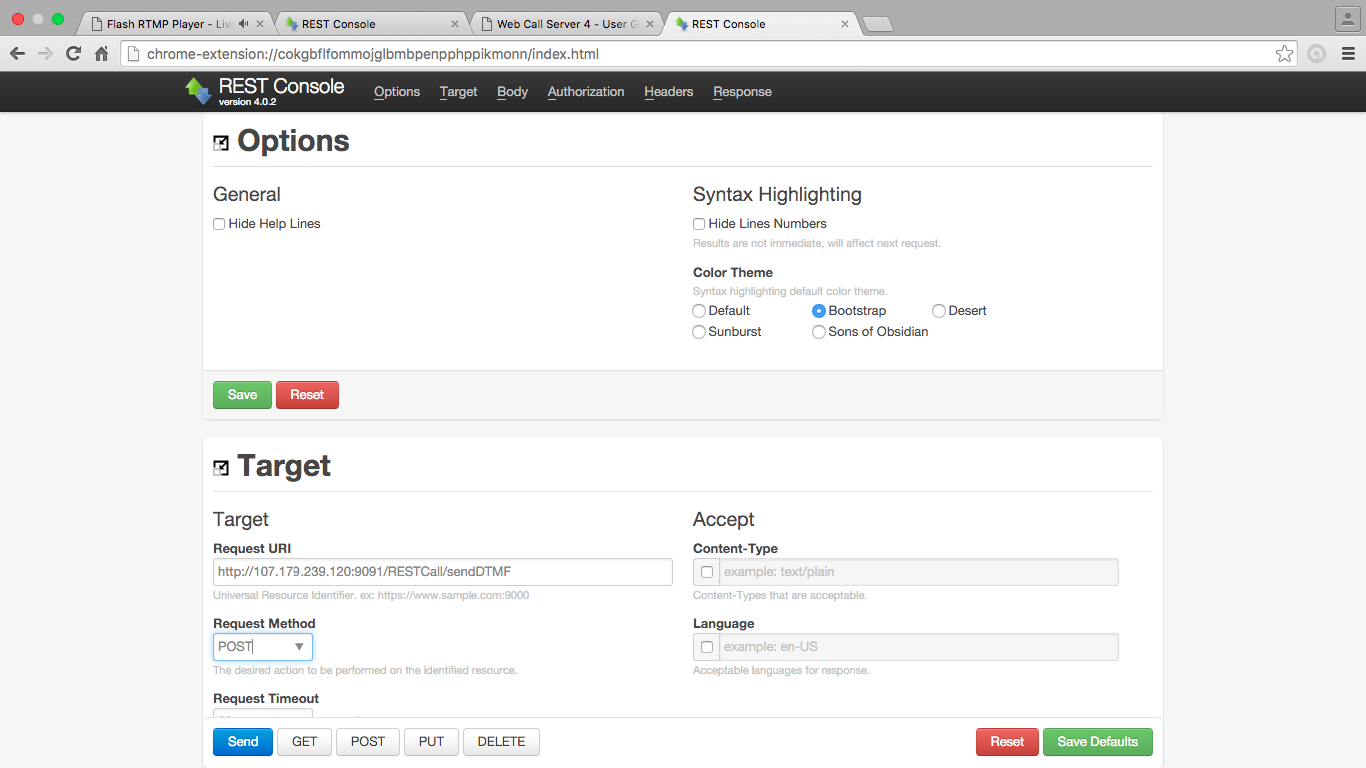
You can also send this request with the following command in the REST console:
{

"callId":"Xq2tlLcX89tTjaji",       # the same ID as in the previous request

"type":"RFC2833",

"dtmf":"1**********311705123#"     # the unique ID provided by the zoom.us service

}

                                   Note: 1********** syntax is a know-how technique specific to zoom.us
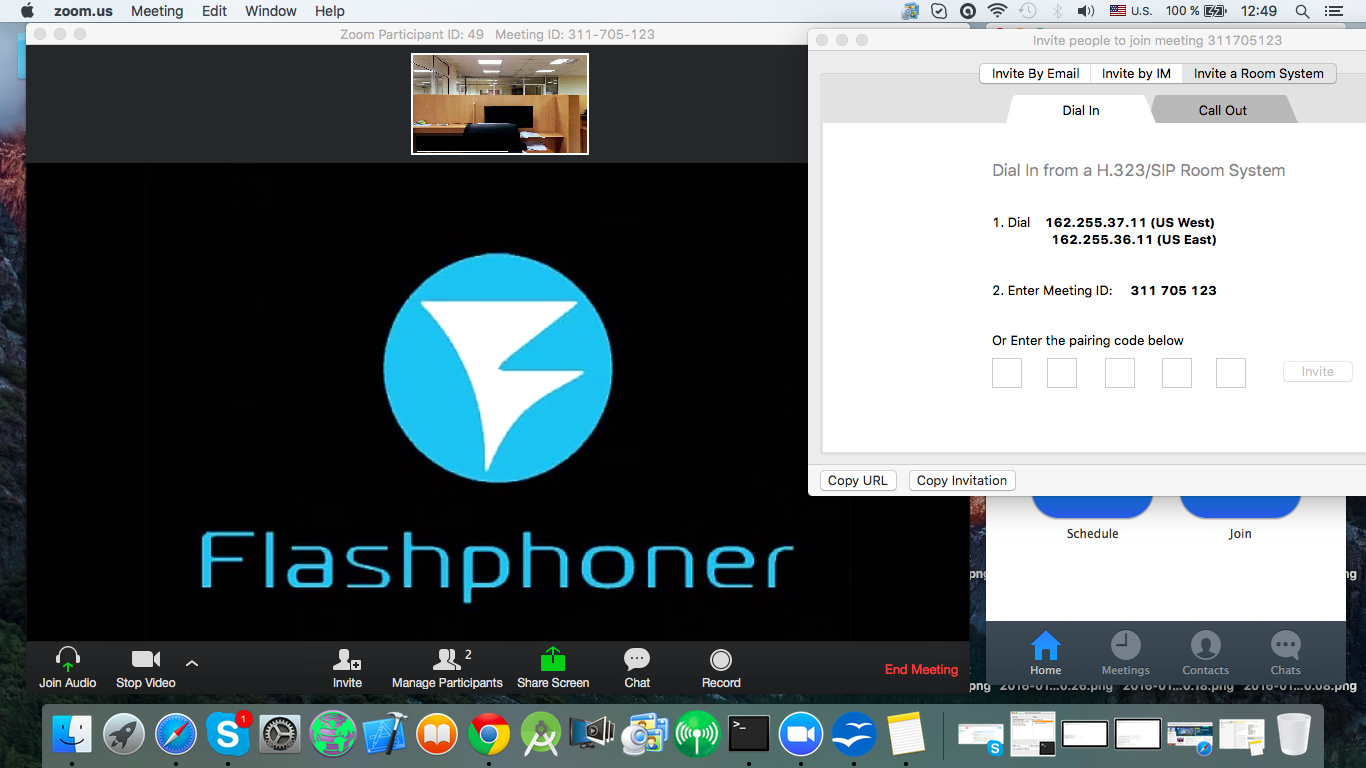
As a result, the given callee connects to the broadcasting of the given meeting as shown below. As you see, the zoom.us interface shows Web Call Server logo, which is one of listeners of the running meeting.
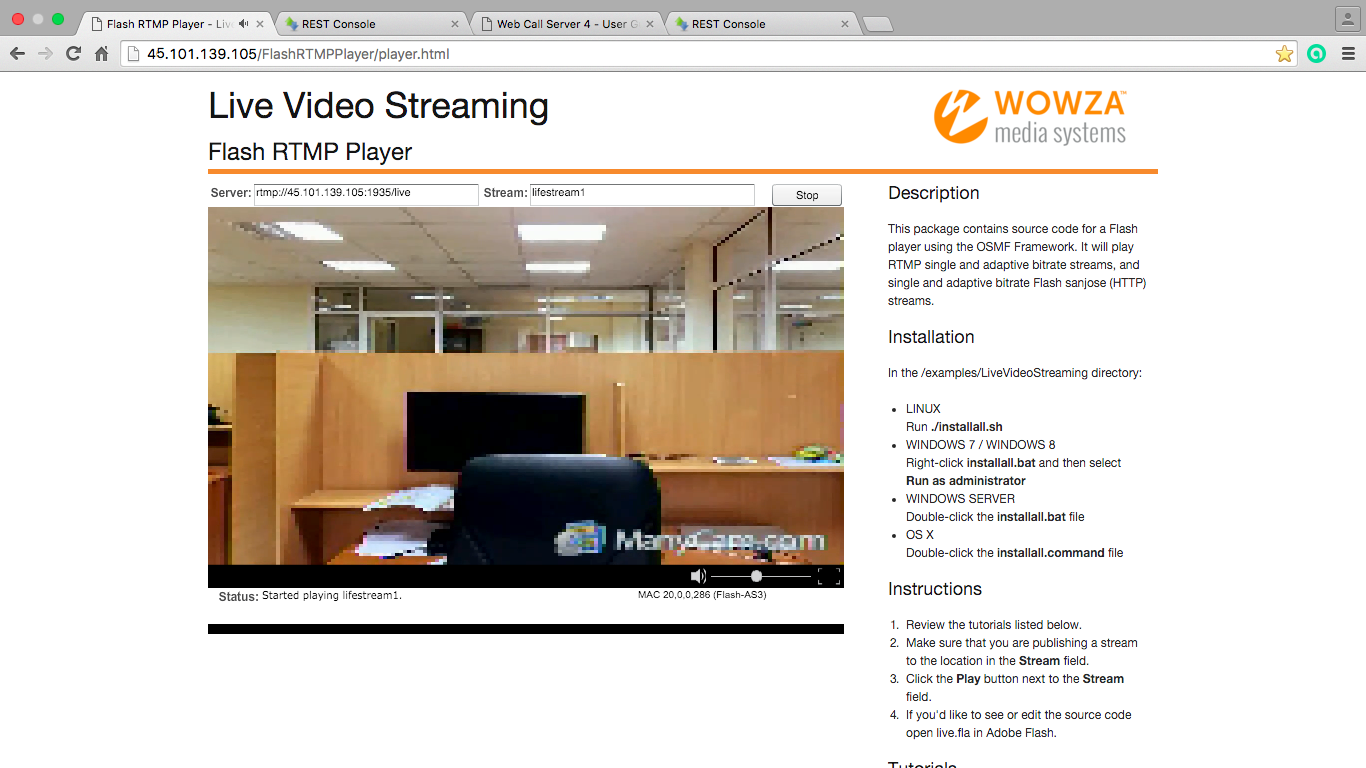
At the same time, in the Wowza Flash Player window we can see the broadcasting redirected through Web Call Server 4 from zoom.us to the Wowza Streaming Engine server. (see the screenshot).
Therefore, using only two commands send via the REST console on Web Call Server 4 we were able to initiate participation in a meeting on the zoom.us service and redirect content (both the picture and sound) to the Wowza Streaming Engine server for further broadcasting via the CDN network.
Broadcasting several Zoom.us connections
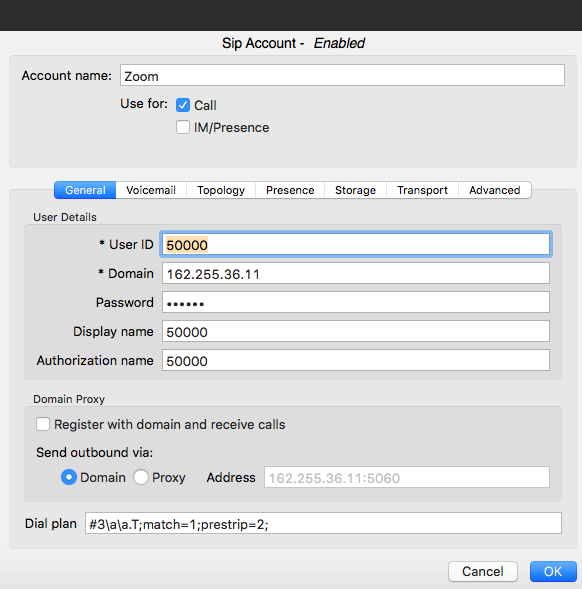
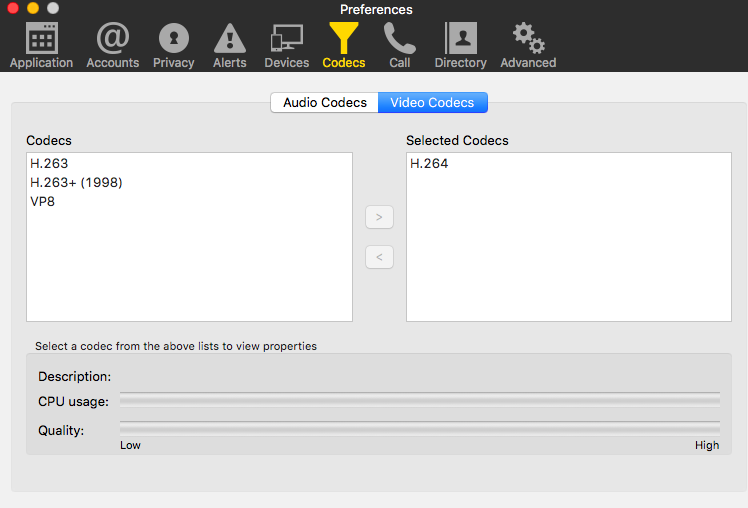
Web Call Server 4 can deliver broadcasting of any number of connections from the zoom.us service as our example illustrates. To do this, you need to configure Bria account as shown on the following screenshots:

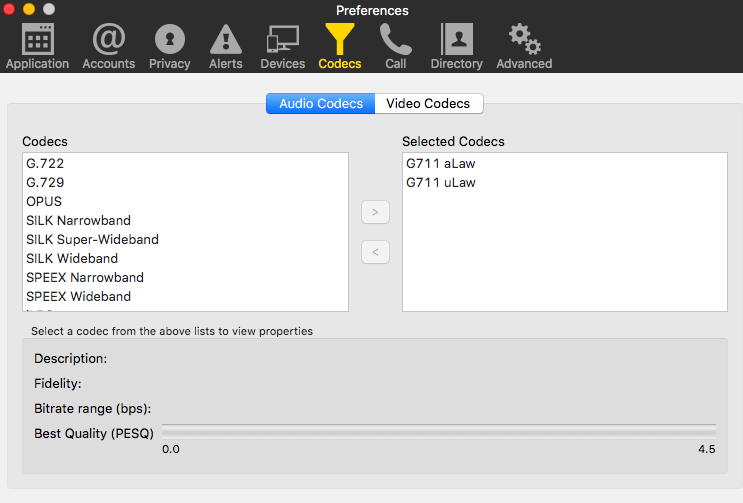
And we need to install required codecs for audio and video:
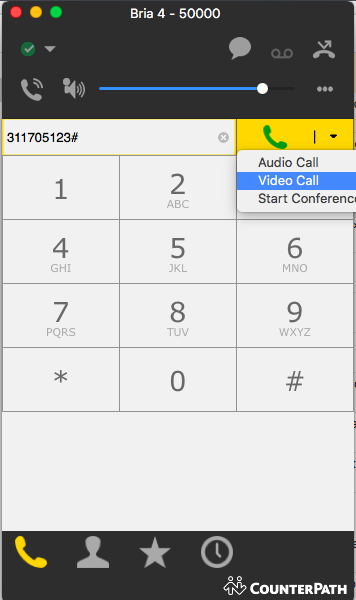
Then, after you enter the unique ID of a meeting room, connection is established to the conference and the content is broadcast via the CDN server.
Analyzing possible integration problems
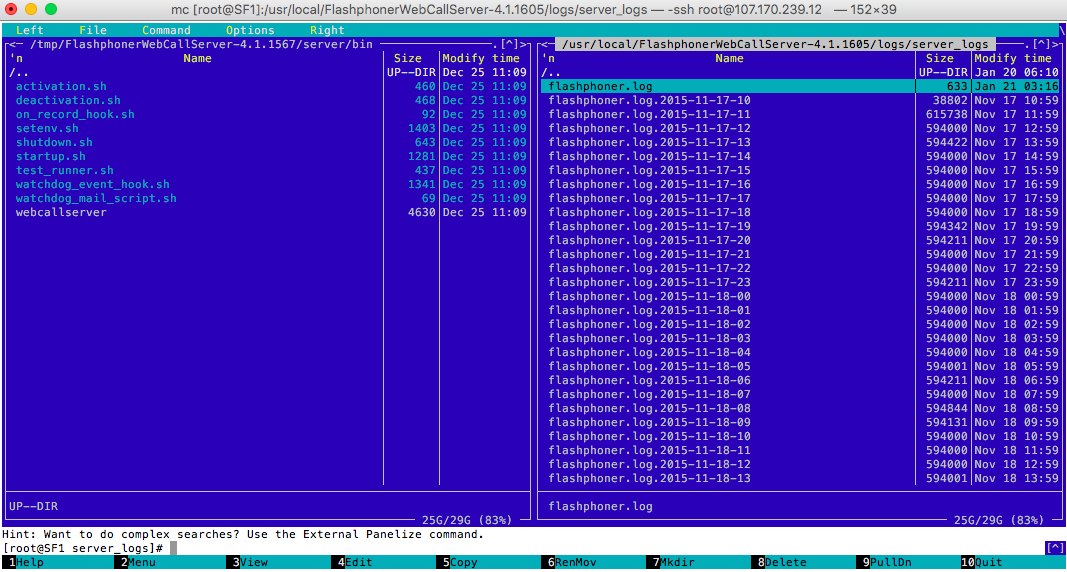
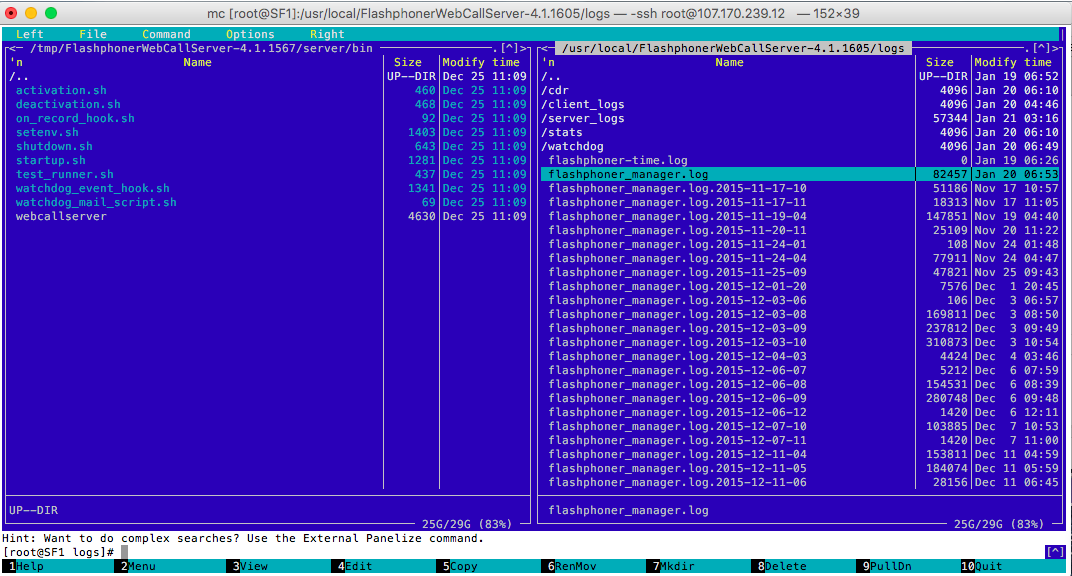
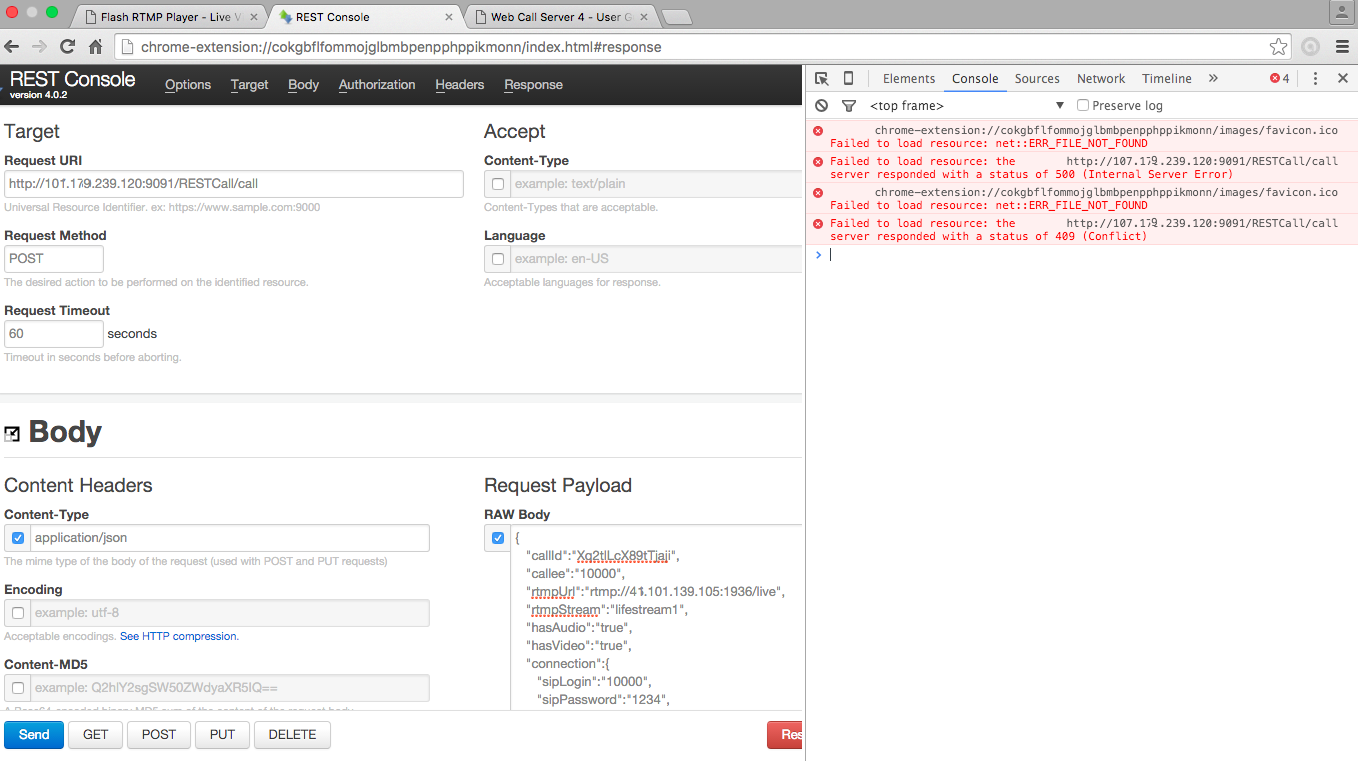
To find out possible reasons of errors an failures during cooperation between Web Call Server 4 and other software and services, we recommend to take a look at log files on the Web Call Server 4 installation server, as shown on the pictures below:
You can see results of your requests sent via the REST console, you can use Google Developer Tools, as shown below:
Integration with Twilio
To test flexibility of the Web Call Server 4 integration platform we also ran tests to check cooperation with the Twilio service. The layout of the experiment is shown on the diagram:

Configuring a Twilio account and a SIP domain
Before using Twilio, we need to configure the account at the service and create a domain softphone will connect to. The steps needed to do this are shown below:
Step 1. Create a domain, in our case - flashphoner2

Step 2 - Create an access control list and define domain permissions

Step 2.1 - Build a list of IP addresses that are allowed to access this domain.
It is crucial that you included both IP addresses of person's devices (softphone) and the IP address of Web Call Server 4.


Step 2.2. - Assigning permissions

After the domain is created in the Twilio service, permissions are set and the list of allowed IP addresses is ready, we can start configuring the softphone, in our case - Bria 4.
Configuring Bria and connecting it to the Twilio domain
In Bria settings, you should create an account to access Twilio as shown on the pictures below:


Also, in Bria settings we should configure audio codec usage: G711 aLaw, uLaw, as well as the videocodec H.264.


Now, we can make a test call using Bria and listen Twilio's auto-responder message. If the domain on the service is configured properly (and you can hear the auto-responder in Bria), it is time to create the control command for Web Call Server.
Changing Web Call Server configuration to work with Twilio
To test Twilio and Web Call Server 4 configuration we need to change server settings. Changes are made to the flashphoner.properties configuration file.

In particular, we change the set of used codecs and a number of other parameters.

What and how to change in the config is specified in Web Call Server 4 documentation supplied by the manufacturer of the integration server.
After modifying the configuration of Web Call Server, reboot of the server is required to make changes take effect:
[root@SF1 conf]# service webcallserver stop

FlashphonerWebCallServer: stopping [OK]

[root@SF1 conf]# service webcallserver start

FlashphonerWebCallServer: starting [OK]
Managing Web Call Server As in the previous experiment, Web Call Server is managed by sending REST commands via the REST console in Google Chrome. This is shown below:
{

"callId":"Xq2tlLcX89tTjaji",

"callee":"flashphoner2.sip.twilio.com",

"rtmpUrl":"rtmp://45.100.109.105:1936/live",

"rtmpStream":"lifestream1",

"hasAudio":"true",

"hasVideo":"true",

"connection":

                    {

                     "sipLogin":"flashphoner2",

                     "sipPassword":"RadK2151312",

                     "sipAuthenticationName":"flashphoner2",

                     "sipDomain":"flashphoner2.sip.twilio.com",

                     "sipPort":"5060",

                     "sipRegisterRequired":"false",

                     "appKey":"callApp"

                     }

}
The request is sent to the Web Call Server address: http: //107.179.239.129:9091/RESTCall/call.
As a result, a call to the SIP domain of the Twilio service is initiated, and the Flash Player allows listening the response received from Twilio. Specifically, you can hear Twilio's auto-responder message.
Therefore, as a result of the Web Call Server 4 operation testing, when Web Call Server 4 was an integration solution to couple Twilio with Bria, we made sure that the integration server can cooperate with the Twilio service and softphone connected to it.
Integration with OpenSIPS
To test cooperation with IP-PBX solutions, we have conducted a test with IP-PBX Open SIPS. Testing framework layout is shown below:

In this case, Bria works as a "service" accepting calls from third-party persons and responding with content. Due to the changed role of Bria, we need to change settings as shown on the screenshots below. In particular, we need to create an account for calls to IP-PBX OpenSIPS:

Like in all previous cases, to see if there's an ability to control Web Call Server, we send a request:
{

"callId":"Xq2tlLcX89tTjaji",

"callee":"10050",

"rtmpUrl":"rtmp://45.101.139.105:1935/live",

"rtmpStream":"lifestream1",

"hasAudio":"true", "hasVideo":"true",

"connection":

                     {

                      "sipLogin":"10051",

                      "sipPassword":"15001",

                      "sipAuthenticationName":"10051",

                      "sipDomain":"87.222.225.52",

                      "sipPort":"5080",

                      "sipRegisterRequired":"false",

                      "appKey":"callApp"

                      }

}
Note, that the call goes through the account 10051 created on the OpenSIPS server, and the "number" of the callee is specified in the field of the same name.
As a result, the call made via Web Call Server 4 to the "account" 10050 was redirected to the streaming server and played via Flash Player.
Integration with Vidyo
One more service we tested is Vidyo.com. The need to perform wide broadcasting is caused by the limitation of this service on the maximum number of participants each broadcast (meeting) can have. Therefore, to run a meeting for 50, 100 or more participants with this service requires another solution.
As with other services, first, we sign up to the service.


Then, after signing up, we need to install software to the local computer and enter data you received upon activation of your account to connect to the service.


After you enter data, the service connects and allows creating a meeting (room). The screenshot shows that each signed in and connected user is assigned with a unique extension number.
To connect other participants to the meeting (room) you need to invite other participants, for instance, by e-mail.
When you click the corresponding icon in the program window, a draft message is created in the e-mail client already containing data you need to tell to other potential participants of the meeting. The text of such a message is listed below:
Let's meet via Vidyo!
- To join from your desktop or mobile device: Click https: //join.vidyo.com/flex.html roomdirect.htmlATkey=1sQAgMIbOVihE3SFKKjl47oryI
- To join from your H.323/SIP video conferencing system inside the US: 75.98.89.60 and 1501005148 and PIN (If required)
- To join from your H.323/SIP video conferencing system outside the US: 31.186.235.56 and 1501005148 and PIN (If required)
- To join from telephone: (800) 916-5971, Conference ID 1501005148, and PIN (If required)
NOTE: Any video, audio and/or materials viewed during this conference may be recorded. Need help getting started? Check out the Vidyo Knowledge Center at http://www.vidyo.com/knowledge-center/
To test how the data acquired from the Vidyo service perform, we created an account in the Bria softphone based on the data provided by the service:

When we created an account in Bria, we assumed a user name and a password can be arbitrary and only crucial things are the IP address to connect and (later) the number to dial to connect to the meeting room.
Note that only the Bria account specifically created for the Vidyo service must be enabled, so that the call was made to this specific service.
After the number 1501005148 is dialed on the Bria's keyboard, the dialing starts and Bria connects to the virtual meeting room.
In the program window you can see a new participant has arrived, as shown on the screenshot below:

Since our test through Bria was successful, let's try to test integration of Web Call Server 4 with the Vidyo service.
To do this, we create a command in the REST console as shown on screenshots below. Then we send a request to Web Call Server 4.


After sending a request, a new participant of the meeting (with the ID we specified in our command to Web Call Server) appears on the website of the Vidyo service.

Meanwhile, in the player we use to test if broadcast goes or not, we can see a picture transmitted by the initiator of the meeting to the service as a placeholder for web camera broadcasting.

Previously, we described a mechanism to launch streaming video server, and while conducting this test we used both AMS and WSE. Web Call Server settings are the same we set when tested the zoom.us service.
Integration with Blue Jeans
One of relatively popular web conference services is Blue Jeans. We decided to test integration with this service too.
This service offers quite a simple mechanism to start a meeting. First, you need to sign up and create an account as shown below:

After this step, as before, we need to install software provided by Blue Jeans.


After Blue Jeans software is installed, all other activity is channelled through it.
Apparently, to connect someone to the meeting you should start this meeting first. In Blue Jeans software, create a meeting and send meeting data to potential participants. In our case:
- IP address (dial IP)
- Meeting ID
- Passcode
If the second participant you want to invite also uses the same Blue Jeans software, the service allows entering the code in a special window ("pairing code"), so you could parallel your software and the software of the second participant. However, we didn't use this option in our test. Instead, we used the meeting ID and the passcode provided by the service.

To get data required to connect to the virtual meeting room, we decided to test how the service cooperates with the Bria softphone, just like we did before.
So, we created a Bria account:

Please note, that we acquired the Domain data from Blue Jeans community, because when you create a room, the service offers using an IP address (as shown above) to dial or the bjn.vc domain name.
The required notation to connect via SIP is sip.bjc.vc as described in messages of community members shown below:

After we created a Bria account, we entered the ID of the meeting on the keyboard. This resulted in the picture (in our case this was a video fragment previously recorded in ManyCam) being broadcast to the meeting, while the data of the meeting were broadcast to Bria as shown below:

Then, we tested integration of Blue Jeans and Web Call Server 4 using the REST console. We sent to Web Call Server 4 address: http: //107.179.239.120:9091/RESTCall/call the following request:
{

"callId":"100501Cxbsf",

"callee":"5322844144",

"rtmpUrl":"rtmp://45.101.139.105:1935/live",

"rtmpStream":"livestream1",

"hasAudio":"true",

"hasVideo":"true",

"connection":

                    {

                     "sipLogin":"100501",

                     "sipPassword":"9354",

                     "sipAuthenticationName":"100501",

                     "sipDomain":"sip.bjn.vc",

                     "sipPort":"5060",

                     "sipRegisterRequired":"false",

                     "appKey":"callApp"

                     }

}
Note that we put the ID of the meeting to the callee field of the request, and the data we've found in the community (sip.bjc.vc) to the sipDomain field.
After the connection is established, you can see in the Blue Jeans program window that several new participants has arrived (one of them is Bria, and the other one is Web Call Server 4). This is shown below.

Correspondingly, in the player we see a "picture" from the local computer (as shown below). That is, we see what Blue Jeans software "sees" locally. Then, Blue Jeans software sends this video to the service, and Web Call Server 4 initiates sending and receives a response from the Blue Jeans service, then redirect the response to the streaming video server (AMS or WSE in our case).
Finally, Flash Player displays this video.

Generally, aside from the lack of information about the correct domain for the SIP connection, our overall impression about Blue Jeans was positive, working with the service is easy and relatively effortless.
Integration with Lifesize
One more service we checked the integration with is Lifesize.
The same way as with other services, you can start using Lifesize after signing up on the website and installing the software provided by the server. That's what we did.
After installing the software locally, you should create a meeting as usual (see the screenshot below):


For each meeting, the service provides contacts (data) a third-party participant can use to make a call and join the meeting, as shown below:


We used the data provided by Lifesize to dial and was pleasantly surprised that each connection stage is accompanied by visual informing in addition to the voice assistant which is pretty standard for all competitive solutions:

As usual, Web Call Server established a connection to the Lifesize server via the REST console using the provided data.

The service software shows a window of the connected participant:

And displays the number of participants:

Response results were broadcast by Web Call Server to the streaming server (AMS or WSE).


Subjectively, this service is more particular about quality of the connection, but we have no any specific evidences of that.
Integration with iMeet
The iMeet service offers a range of solutions to conduct public events in the Internet, also for participants connecting using their telephones.

The interface of the software a user should download and install to use the service strikes with great visual appearance and a lot of accompanying information (time, whether forecast and so on).
Just like with previously reviewed services, this service provides data to connect, but in the form of URI: http://www.imeet.com/georgeb


Similar to other services is the ability to invite third-party participants to the meeting (also by e-mail). Plus, there's a convenient option to make the service make a call to the phone number of a participant (the service dials you, not you dial the service).
Using the invitation link received via e-mail we were able to participate in a meeting from a web browser (without installing software):


However, we were not able to dial to the meeting using the Bria softphone, which is supposedly explained by the following comment at the service:
"While iMeet does not have a direct integration with SIP/SIMPLE or XMPP, iMeet provides each host with a personal online meeting room, so you can also simply put in your URL (e.g. www.imeet.com/georgeb) into an IM conversation to invite guests into your meeting. You could also store your iMeet URL in your Salesforce profile and allow people to connect to your iMeet directly from there!" ( https://community.imeet.com/thread/1700 )
Even with the provided recommendations and the below Bria configuration the connection to the meeting still wasn't established (we tried to set the Domain parameter both to www.imeet.com/Vlad439323 and http://www.imeet.com/Vlad439323):

We daresay that SIP connection requires other software and other services offered by iMeert, for example, iMeetVRC:

We will test this in future tests.
Conclusions
Based on chosen criteria of selection and experimental conditions we more or less successfully (explained below) managed to test mutual compatibility of various services and software products. Surprisingly, many services integrated with Wowza Streaming Engine and Adobe Media Server more or less effortlessly thanks to usage of third-party software Web Call Server 4.
In particular, we managed to make sure of the following capabilities:
- ability to initiate a call to the Zoom.us service and manage the call;
- ability to broadcast streaming content, including multiple Zoom.us connections;
- Web Call Server's ability to call to Twilio and persons connected to this server;
- ability to manage calls of OpenSIPS persons connected via IP-PBX. Integration with Vidyo turned out to be simpler than zoom.us, because connection initialization and management came down to just one command in Web Call Server;
- Lifesize subjectively required higher bandwidth to display the video with proper quality, while Blue Jeans turned out to be the simplest service of all and allowed connection to the meeting of both Bria and Web Call Server 4 with just a few elementary steps.;
All test were conducted with two streaming servers - Wowza Streaming Engine and Adobe Media Server.
Testing results are summarized in the table below:

When we chose candidates for testing we realized that some services are not available any more. Others do not offer online versions of the service and require installing server software. Some services are niche messengers or simply do not support SIP.
We hope this test of various services and software will inspire others to take this list https://vsee.com/videoconference and conduct their own study with the same or other set of software. It would be interesting to know results and conclusions of such an experiment.
References
- Traffic analyzer - https://www.wireshark.org
- Wowza Streaming Engine - https://www.wowza.com
- Adobe Media Server - http://www.adobe.com/products/adobe-media-server-family.html
- Web Call Server 4 - http://flashphoner.com
- www.zoom.us
- www.twilio.com
- www.lifesize.com
- www.bluejeans.com
- www.vidyo.com
- www.pgi.com
- CounterPath software - http://www.counterpath.com/bria/
- Video/audio processing software - https://manycam.com
Link to the useful file
